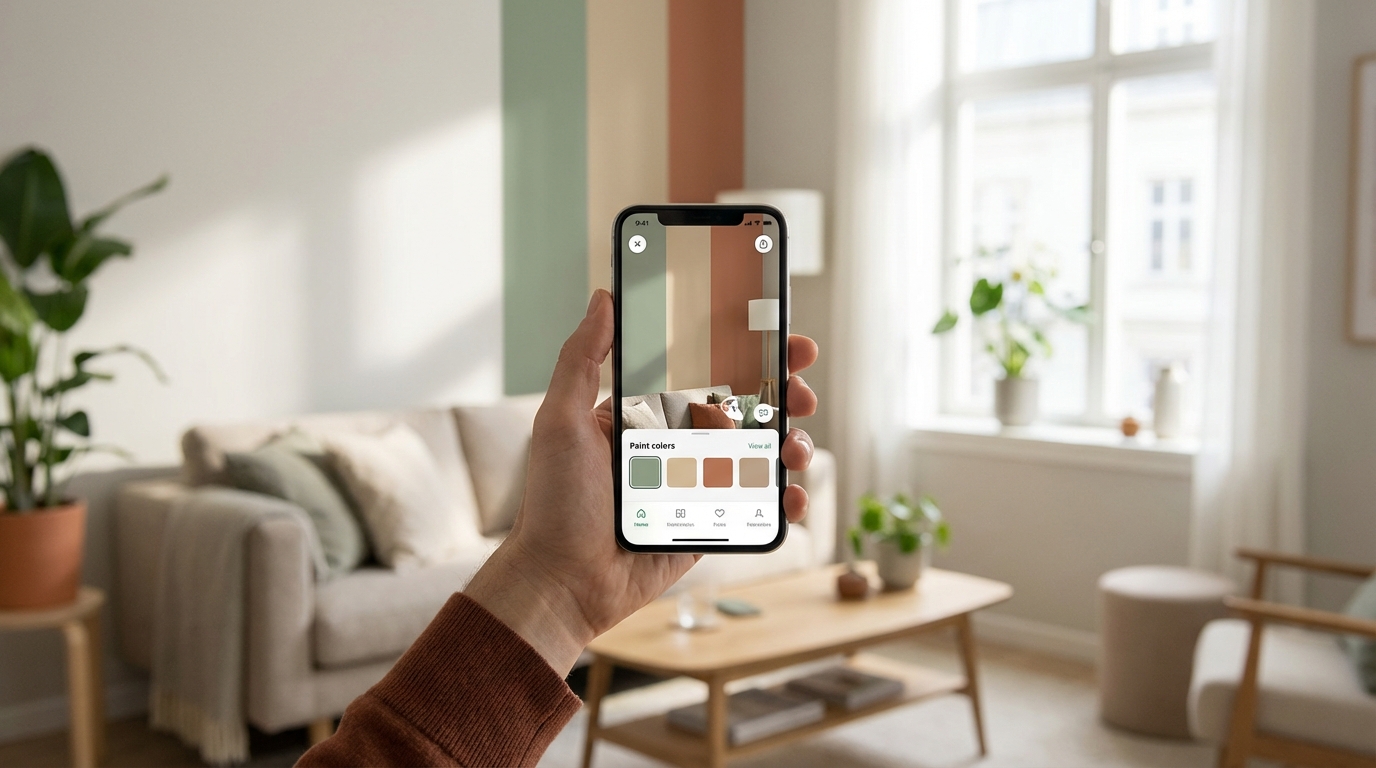
AI paint visualization lets you see exactly how a paint color will look on your actual walls—using just your phone camera. You snap a photo, pick a color, and the AI shows you a realistic preview. No sample pots, no tape, no waiting for paint to dry. Just instant answers to "will this color work in my room?"
I used to buy 6-8 sample pots every time I repainted a room. At $8-10 each, that's $60-80 per room just on samples. Multiply that by the four rooms I repainted last year and... yeah. It adds up. And half those samples end up getting a single swatch painted before I realize the color is totally wrong.
These days I start with AI visualization, narrow it to 2-3 finalists, then sample just those. The whole process is faster, cheaper, and honestly more fun than the old paint-chip-squinting method.
The old way vs. the new way
Here's what choosing paint colors looked like five years ago:
- Go to the paint store
- Grab 47 paper color chips
- Hold them against your wall and squint
- Buy 4-6 sample pots based on vibes
- Paint small swatches on the wall
- Realize half of them look completely different than expected
- Buy 2-3 more samples
- Finally pick one
- Total cost: $80+ and two weekends
Here's what it looks like now:
- Open an AI visualization app
- Take a photo of your room
- Try 20 different colors in 5 minutes
- Narrow to your top 2-3
- Buy just those samples for wall testing
- Pick your winner
- Total cost: $16-24 in samples and about an hour
I'm not saying digital tools are perfect—they're not, and I'll get into the limitations. But as a first filter? They're ridiculously useful.
How AI paint visualization actually works
The technology behind it is more complex than you'd expect. Here's the simplified version:
Step 1: Scene Understanding. When you upload a photo, the AI identifies what's in it—walls, ceiling, trim, furniture, windows, floor. It's essentially mapping the geometry of your room from a 2D image.
Step 2: Surface Detection. The AI specifically identifies paintable surfaces. It knows the difference between a wall and a bookshelf, between trim and the ceiling. Good tools let you select exactly which surfaces to recolor.
Step 3: Color Application. This is where it gets interesting. The AI doesn't just slap a flat color overlay on the wall. It preserves:
- Shadows and highlights — The paint color adjusts where there's shade vs. direct light
- Texture — If your wall has texture, it shows through
- Lighting conditions — The preview accounts for the actual lighting in your photo
- Reflections — Nearby objects that cast color onto walls
Step 4: Realistic Rendering. The final output should look like a real photo, not a Photoshop job. The best tools make it genuinely hard to tell the visualized version from a real photo.
What makes a good AI paint visualization tool
Not all tools are equal. After testing a bunch, here's what separates the good from the useless:
Accuracy of color rendering
This is the big one. Does the color on screen look like the actual paint will look on your wall?
The honest answer: it's close, but never 100%. Screens can't perfectly replicate paint. Your phone screen has a color profile, a brightness setting, and a backlight that real paint doesn't have. But good tools get you within about 85-90% accuracy—close enough to eliminate the obviously wrong options.
Edge detection
Does the AI correctly identify where the wall ends and the bookshelf begins? Bad tools bleed color onto furniture, windows, and trim. Good tools have clean, precise edges.
Lighting awareness
Does the preview account for the actual lighting in your room? A color should look different in the sunny corner vs. the shaded corner of the same wall. The best tools handle this. Basic tools apply a flat color overlay—which tells you almost nothing useful.
Speed and usability
If it takes 30 seconds to render each color option, you're going to test three colors and give up. Good tools render nearly instantly, so you can flip through dozens of options in minutes.
Color library
Does the tool have actual manufacturer colors (Benjamin Moore, Sherwin-Williams, Behr) or just generic swatches? Being able to pick "Hale Navy HC-154" and see it on your wall is infinitely more useful than seeing "dark blue #3."
How to get the best results
The quality of your input dramatically affects the output. A few tips:
Take a good photo
- Use natural light when possible. Flash creates harsh shadows that confuse the AI.
- Shoot straight on, not at an angle. The more the wall fills the frame, the better.
- Clear clutter from in front of the wall. The AI is great but it can struggle with complex foreground objects.
- Take photos at the time of day you use the room most. If you mostly use your living room in the evening, photograph it in evening light. That's when the color accuracy matters most.
Try multiple colors quickly
The beauty of digital is speed. Don't just test the three colors you're already considering. Try things you'd never have sampled in real life—that dark green you think might be "too much," the warm taupe that seemed boring on the chip. You might surprise yourself.
I found my current bedroom color (Aegean Teal) this way. I never would have picked up that chip at the store. But seeing it digitally on my actual wall made me go "...huh. That actually works."
Test different walls
The same color looks different on different walls in the same room—because lighting varies. Test the color on the wall facing the window AND the wall opposite the window. If it looks good on both, it'll work.
Compare side by side
Most good tools let you save visualizations. Create a shortlist of 5-6 options, save them all, and then flip between them. Seeing them back to back is way more useful than looking at them one at a time.
The limitations (being honest)
No digital tool replaces the real thing entirely. Here's where they fall short:
Screen color ≠ paint color. Your phone screen emits light. Paint reflects light. They're fundamentally different media. A color on screen will always look slightly more vibrant than actual paint. Adjust your expectations—if a color looks "almost too bright" on screen, it might be perfect on the wall.
Sheen doesn't translate. You can't really see the difference between matte and eggshell on a screen. Digital tools show color but not texture or reflectivity. This matters more for darker colors where sheen is more noticeable.
Large surfaces feel different than small previews. Even a full-phone-screen preview is still a small image. A color can feel different when it's surrounding you on all four walls. Digital tools help a lot, but for big decisions, still buy that final sample pot.
Undertones can shift. Digital tools sometimes miss subtle undertones—the slight pink in a warm white, the green flash in a gray. These undertones become way more apparent on a real wall.
My recommended workflow (the hybrid approach)
Here's the process that's worked best for me and saves the most time and money:
Phase 1: digital elimination (free, 15 minutes)
Open Muro (or your preferred visualization tool). Upload photos of the room from 2-3 angles. Go wild—try 15-20 colors across different families. You'll quickly eliminate 80% of options. Some colors that looked great on the chip will look terrible on your wall. Some colors you'd never have considered will surprise you.
Phase 2: narrow the field (free, 10 minutes)
From your 15-20 options, pick your top 3-5. Save the visualizations. Show them to anyone who lives in the house and has opinions. Sleep on it.
Phase 3: physical samples (the top 2-3 only)
Buy sample pots for your top 2-3 colors only. Paint large swatches (2x2 feet minimum) on the actual wall. Live with them for 2-3 days. Check morning, afternoon, and nighttime lighting.
Phase 4: decide
By this point the winner is usually obvious. You've seen it digitally, you've seen it physically, you've lived with it for a few days. Pull the trigger.
Total cost: 2-3 sample pots ($16-24) instead of 6-8 ($48-80). And you're way more confident in your decision.
What about professional tools?
If you're a painter, designer, or real estate stager, AI visualization doubles as a client management tool.
Instead of describing a color to a client and hoping they can imagine it, you show them. "Here's your living room in Pale Oak. And here it is in Edgecomb Gray. And here's the bolder option in Evergreen Fog." Client picks in five minutes instead of going back and forth for two weeks.
Some painters I know use Muro during initial consultations. They walk into the room, snap a photo, and show the homeowner three options on the spot. It speeds up the sales process and cuts down on "can you redo this in a different color" callbacks.
The bottom line
AI paint visualization isn't a gimmick anymore. It saves time, money, and the frustration of buying samples that look nothing like what you expected.
Is it perfect? No. Will it replace physical sampling entirely? Not yet. But as a first step, the "narrow down 200 options to 3" step, nothing else comes close.
The old way of squinting at tiny paper chips under hardware store fluorescent lights and hoping for the best? That's the real gamble. Digital visualization is just being smart about it.